You can create your letter and customize it using various fonts styles, sizes, colors, or paragraph styles. Once completed, you can also save the letter as a template to use multiple times.
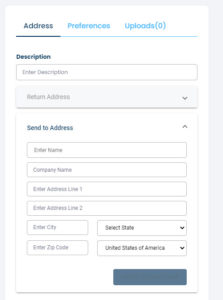
Description: On the right side of the screen you will enter a description. This helps to identify your letter if you ever need to look back on it.
Send to Address: Enter the address that you want the letter sent to. If the address is already in your Address Book, as you start typing the Name and the information will automatically be populated into the fields.
Return Address: Enter the return address. If the address is already in your Address Book, as you start typing the Name and the information will automatically be populated into the fields.
Add to Address Book: If the address you enter is frequently used addresses, you can add them to your address book.
Preferences: This allows you to choose printing options such as Black and White or Color print, printing on one side of the paper or both sides, using perforated paper or reply envelopes. The default will be Black & White print on one side of the paper.
Uploads: You have the option of also uploading documents. These documents will go behind the first page which contains the address, return address and body letter that you write.
After entering your Send to Address, Return Address and preferences, you can now start typing your letter. Use the menu bar to use different fonts, colors or paragraph styles.

Save as Template: If the letter composed could be used again, you can click on Save as Template. This will not save the addresses but will save the letter. When you click on Save As Template you will be asked to enter a Title and Description. This will help you to choose the template when needed. Any uploaded documents will also save with your letter.
Preview: Click on preview to view your document before submission.
Send: Click on Send to process and send your document.

